
Collecting data modules
The ‘collecting data’ modules in the Healthy Country AI and digital program are designed around site surveys, to ensure training provides Indigenous rangers with skills to responsibly collect useful and useable data for a purpose, to monitor the adaptive management of healthy country values.
In each module, trainees are supported to mobilise their own knowledge practices to ensure monitoring technologies are used in a culturally safe way on Country, under the authority of appropriate Elders. Training occurs on the job and can be built into collaborative research projects or monitoring programs so rangers can use monitoring technologies as tools to support their caring for Country work in place.
Modules have been developed for popular environmental and cultural monitoring technologies, including drones (remotely piloted aircraft or RPAs), camera traps, video cameras, and touch GIS. These technologies can be used to collect ecological, social, and cultural monitoring data.
Site survey using drones
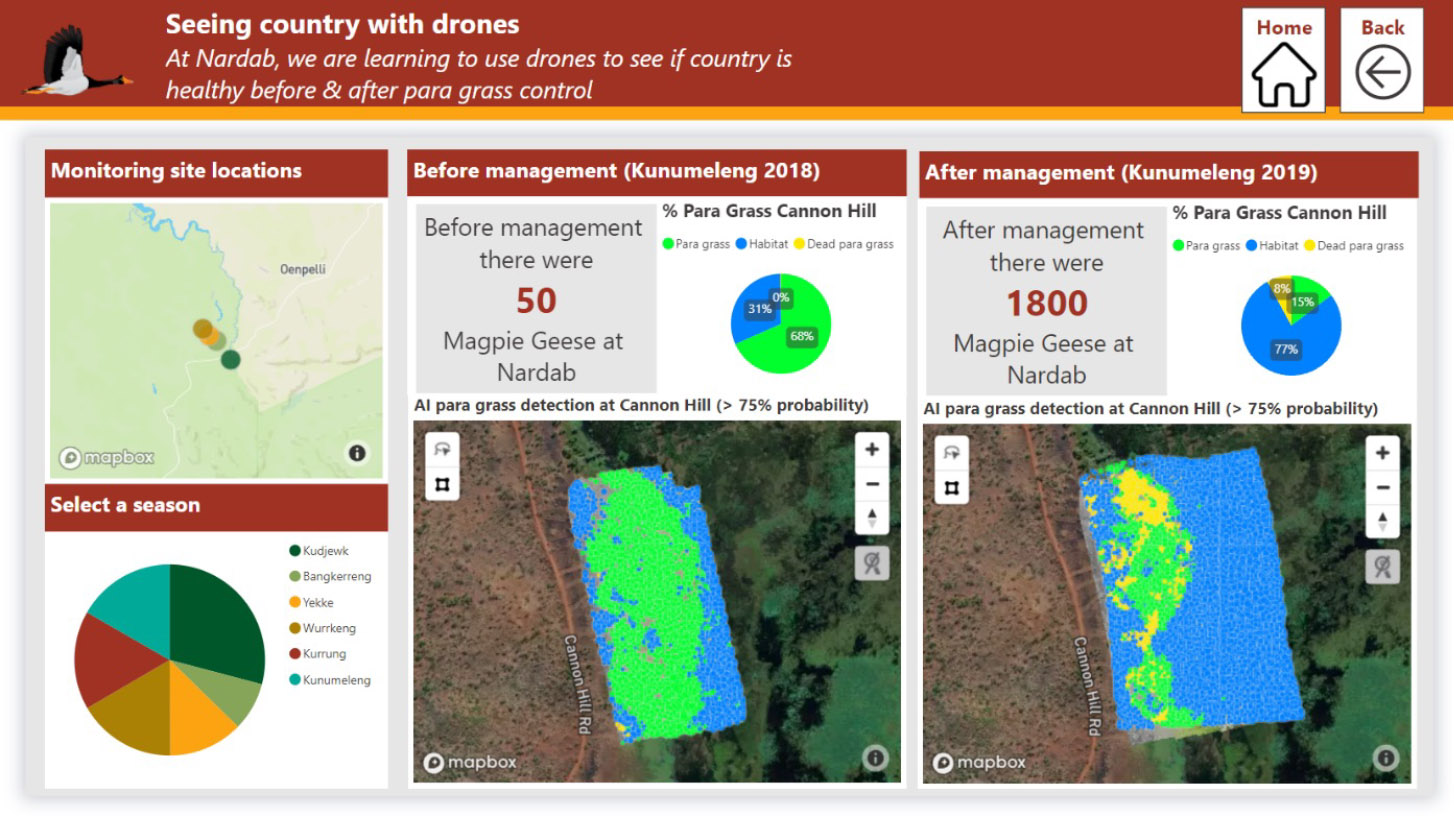
Seeing country from the sky
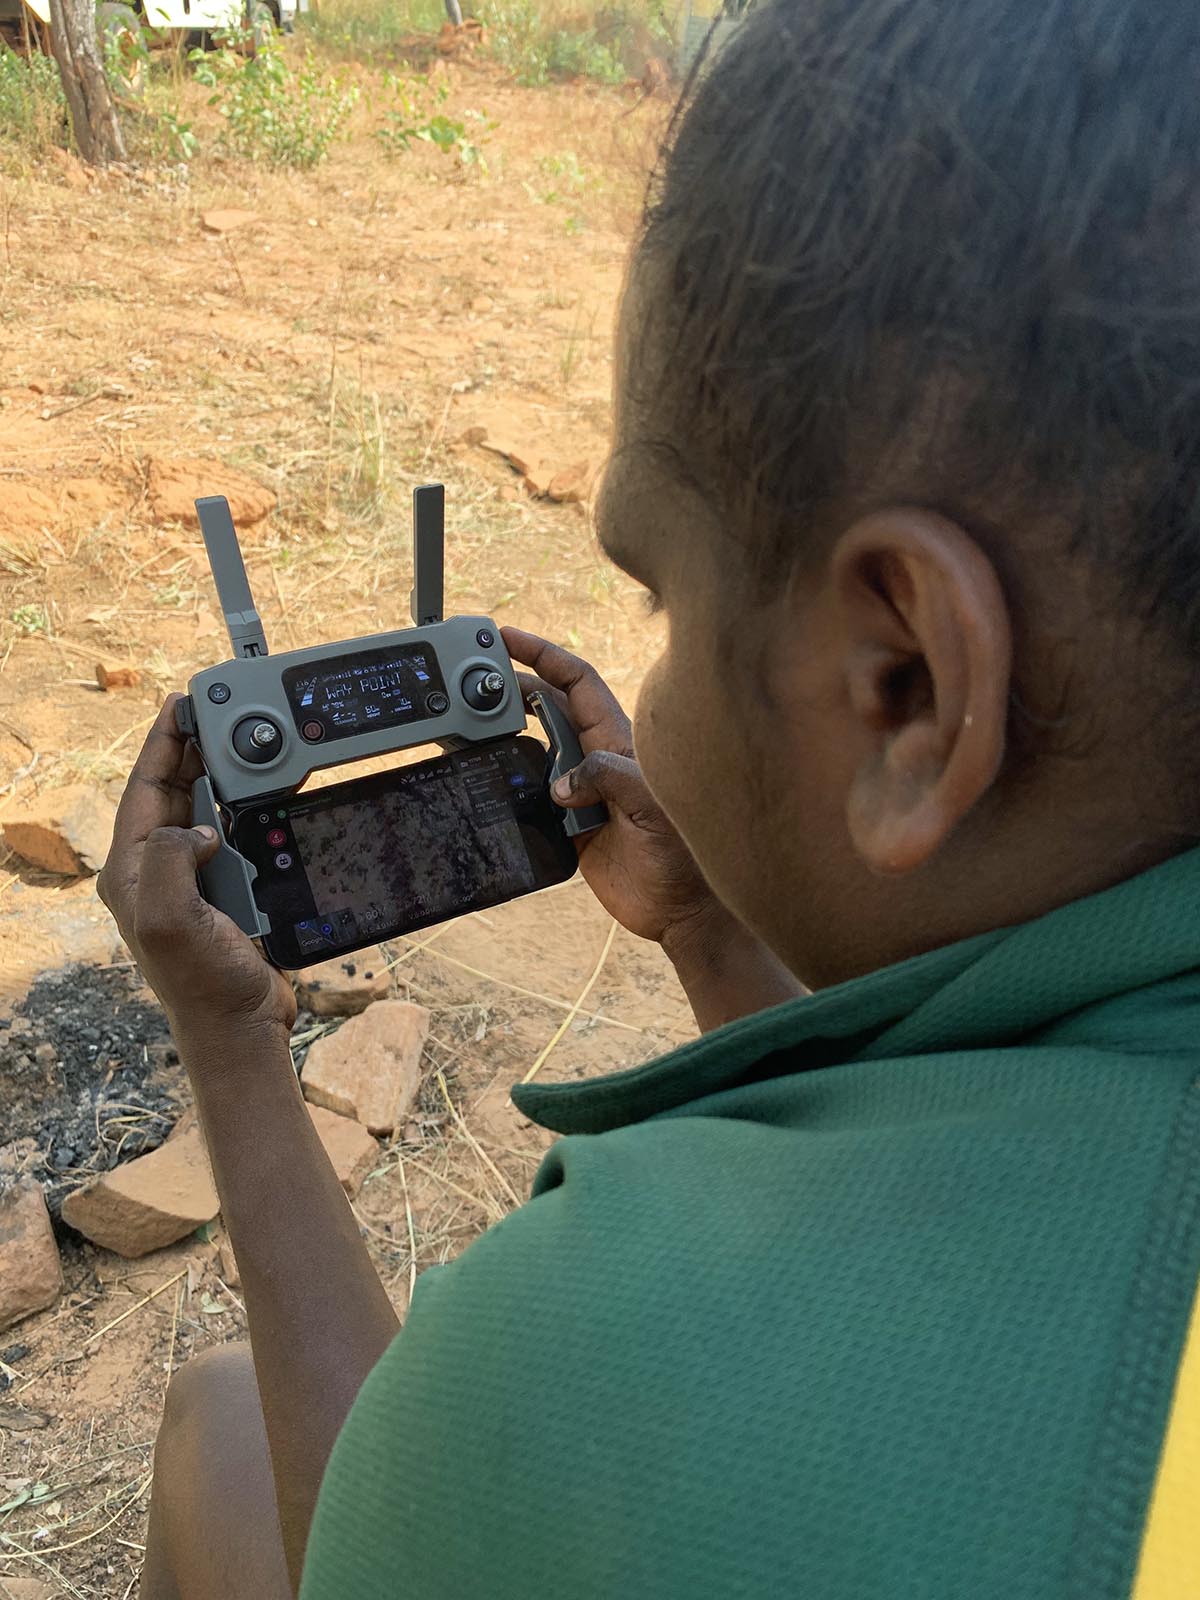
The module for site surveys using drones provides training for Rangers to learn to use drones responsibly on Country and for a purpose, to monitor the adaptive management of healthy country values at sites. Trainees will be supported to mobilise their own knowledge practices to ensure drones are used in a culturally safe way on Country, under the authority of appropriate Elders. They will also learn to launch, land and fly the drone safely, take photos with the drone, use the drone control mapping software to set up a monitoring flight, and ultimately use the drone to monitor a site chosen by the HC team.
The main pre-requisite for this module is module 1: site selection. Before trainees undertake the final skill unit (2.6 Collect monitoring data of site using drone), they need to undertake a formal, one- or two-day drone course to become more confident flying the drone learn about things like safety while flying; troubleshooting in unexpected situations; weather forecasts; risk assessment before flying.
Ideally, trainees would take the skill units in consecutive order, so that trainees build skills and learn to be responsible, controlled, and confident in their use of drones. Skill unit 2.5, where trainees learn to use the drone control mapping software to set up a flight, can be taken with no other skill unit pre-requisites, acknowledging that some trainees might be interested in learning about mapping software, but might not be interested in flying the drone.
A DJI Mini is recommended for the early skill units, as this model is smaller and cheaper for beginners to learn with. A DJI Mavic is recommended for the more advanced skill units.
Skill Units
Beginner
Intermediate
Advanced
- Culturally safe drone use
- Launch and land a drone
- Fly drone in a controlled way
- Take photos of country from the air with the drone
- Collect monitoring data of site using drone
- Transfer photos to computer
- Set up survey area in drone control app to program an automatic flight survey using smart controller
- Set up survey area to program an automatic flight survey using Drone Deploy
- Set up survey area to program an automatic flight survey using Pix4d Capture
- Transfer drone data to computer
- Mosaic layers together to create orthophoto sequence
Check the right people are present and/or have consented to drones being flown on their Country.
Map the area to be surveyed with Traditional Owners, including areas that can be flown over and areas that cannot be flown over.
Discuss, agree on and note down any other rules for drone use in the area to be surveyed.
Prepare physical elements of drone for flight on the ground (batteries, camera, etc).
Turn on and equip drone.
Connect to smartphone or tablet.
Take off.
Hover at eye level.
Fly forward, backward, left and right.
Land drone.
Turn off and disassemble drone.
Launch drone and fly to 10m in air.
Fly drone away from you.
Turn drone around to point back at where you are.
Take a selfie photo of yourself.
Turn drone around to point away from you.
Fly drone back to home base.
Land drone.
Take gimble cover off drone camera and check that it is working.
Launch drone and fly to above tree height.
Fly drone in figure eights, with yourself and your spotter keeping drone in line-of-sight.
Use the map in the drone control app to position yourself.
Take a clear photo or video of area with the drone camera.
Fly the drone using the map to get back to home base.
Test the automatic bring to home function.
Land drone.
Do pre-flight checks (memory card inserted, gimbal cover off, camera working, batteries charged, propellers & batteries connected).
Choose launch spot away from trees and other obstacles.
Connect app to drone and controller.
Launch drone.
Navigate to survey area and manually fly over area of interest or do walking transect taking photos and/or video.
Monitor the flight and surrounds and manage the drone if issues arise.
Bring drone ‘home’.
Land safely.
Remove SD card from drone.
Insert SD card into computer and transfer drone photos to appropriate folder.
Choose an appropriate area at the monitoring site which will show change in healthy country values, can be accessed for management actions, and is maximum 40 hectares in size (30 minutes flying at 70 metres using 3 batteries).
Turn on smart controller and choose ‘Mission Flight’.
Choose ‘create a route’.
Choose ‘mapping’.
Zoom into desired area and tap screen
Choose your Mavic model.
Adjust settings (e.g. altitude, speed).
Select the recently created survey and open.
Press ‘run’ when all checks have been done
Monitor the flight and manage the drone if issues arise.
Pause flight midway and resume flight.
Bring drone ‘home’ and change batteries mid-flight as needed.
Choose an appropriate area at the monitoring site which will show change in healthy country values, can be accessed for management actions, and is maximum 40 hectares in size (30 minutes flying at 70 metres using 3 batteries).
Open computer and open drone deploy website (add link) and login or register if haven’t done already.
On drone deploy website, create a new survey area and name it Open drone deploy app on smartphone.
Make sure the recently created survey is synced with phone.
Select the recently created survey and open.
Open advanced settings and select ‘available offline’.
Turn smartphone on airplane mode and check the survey is still accessible.
On country, start mission.
Monitor the flight and manage the drone if issues arise.
Pause flight midway and resume flight.
Bring drone ‘home’ and change batteries mid-flight as needed.
Choose an appropriate area at the monitoring site which will show change in healthy country values, can be accessed for management actions, and is maximum 40 hectares in size (30 minutes flying at 70 metres using 3 batteries).
Make sure phone or tablet with installed software (Pix4dCapture or Pix4d Capture Pro) is connected to remote controller.
Open Pix4d Capture and login or register if haven’t done already.
Hit the ‘New Plan’ icon and choose generic missions then ‘grid’. Click next.
Adapt grid size and angle of survey path on map using touch screen.
Check and change settings, such as drone brand, flight height, front & side overlap and drone speed).
When all settings and drone are checked, start mission by clicking on its blue button at bottom of screen.
Monitor the flight and manage the drone if issues arise.
Pause flight midway and resume flight.
Bring drone ‘home’ and change batteries mid-flight as needed.
Transfer drone data from SD card in drone to computer.
Upload survey photos into appropriate folder on computer.
Create orthophoto layer [TBC]
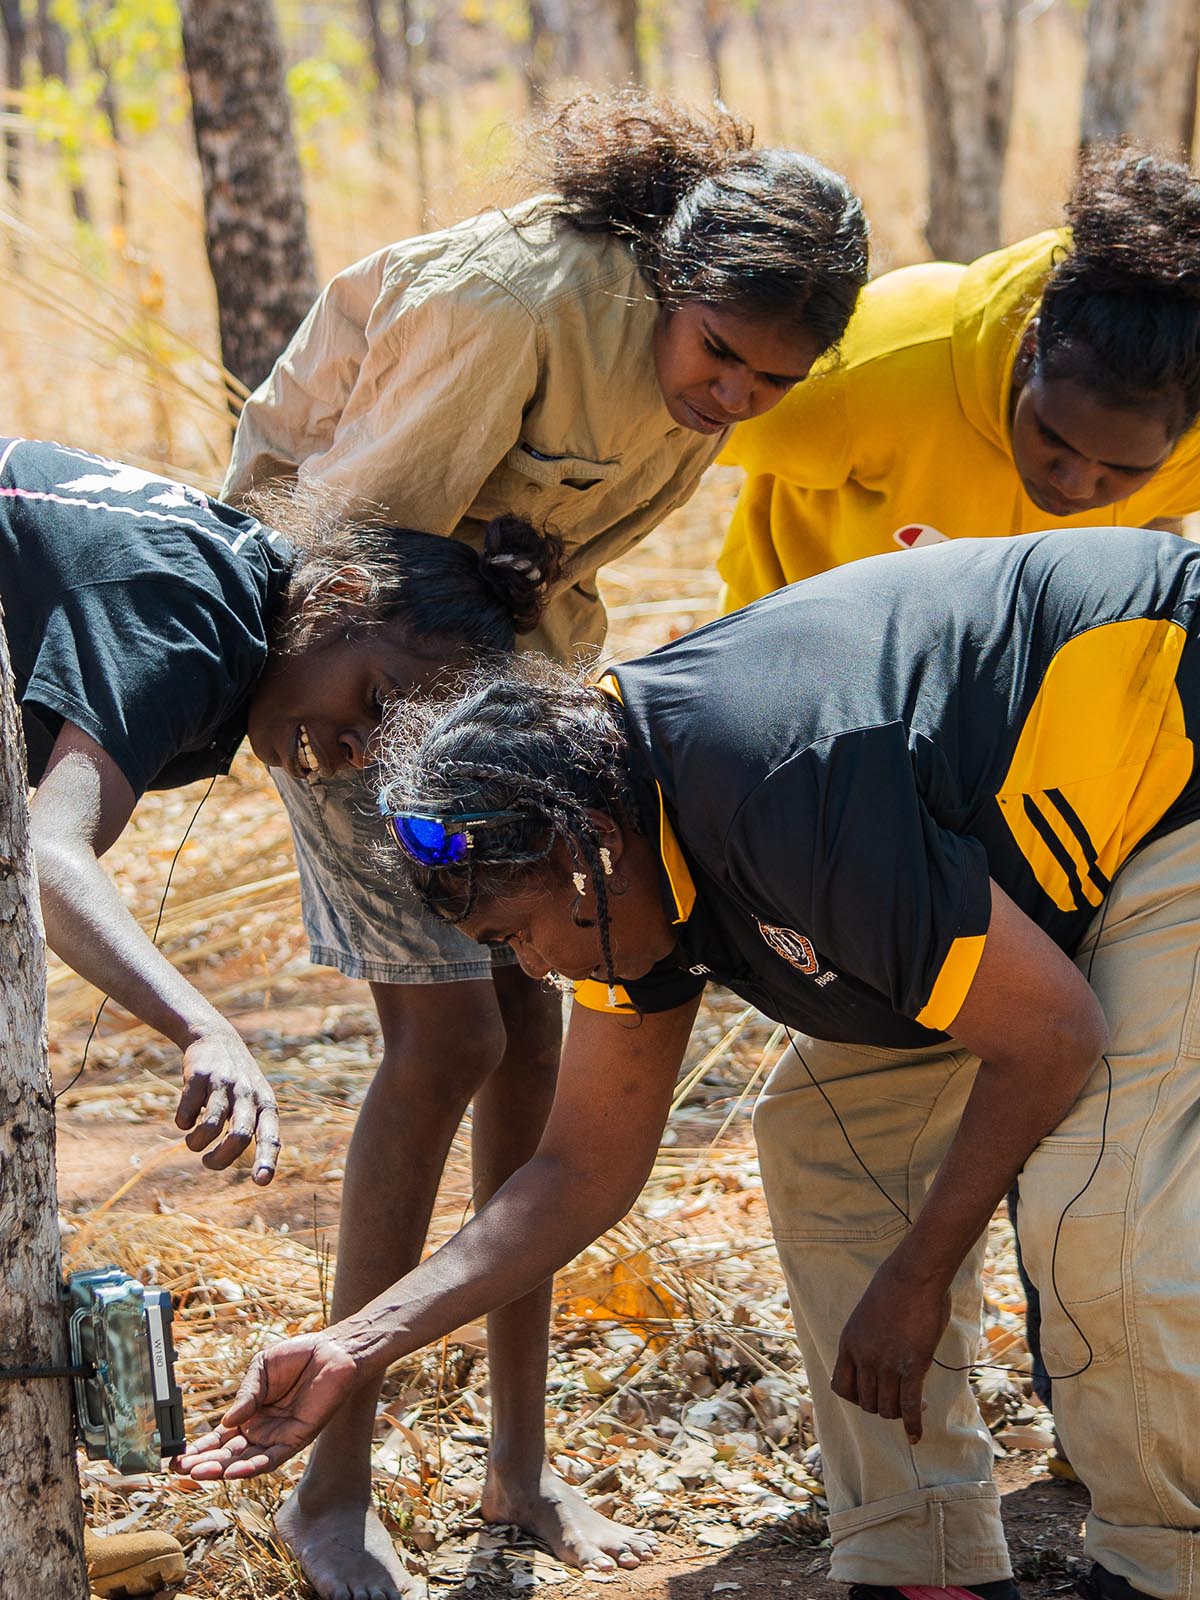
Site survey using camera traps
Seeing country when we are not there
The module for site surveys using camera traps provides training for Rangers to learn to use these technologies responsibly on Country and for a purpose, to monitor the adaptive management of healthy country values at sites. Camera traps are a simple and effective way to understand what animals are on country. Trainees will be supported to mobilise their own knowledge practices to ensure camera traps are used in a culturally safe way on Country, under the authority of appropriate Elders. They will also learn to choose sites to install camera traps, set them up for monitoring, and ultimately use them to monitor Country when the HC team is not there.
There are many online resources for those interested in building further skills in using to use time lapse cameras and motion sensor cameras, see guidelines developed by Warddeken.
The skill units need to be taken in consecutive order, so that trainees build skills and learn to be responsible, controlled, and confident in their use of camera traps.
Skill Units
Beginner
Intermediate
Advanced
- Culturally safe use of camera traps
- Choose sites to install camera traps
- Set up cameras for monitoring
- Install cameras on Country
Check the right people have consented to camera traps being installed on their country.
Agree on areas that should and should not have camera traps.
Drive around country with Traditional Owners to identify places to install camera traps.
Agree on the purpose of monitoring, choose whether the camera will be set on motion sensor or timelapse, and decide on when the cameras will be set out and when they will be retrieved.
Mark the monitoring sites on hardcopy and online maps.
Charge batteries for cameras.
Put batteries in cameras.
Check the SD memory cars is empty.
Put SD memory card in camera.
Turn on cameras.
Set date, time, type of monitoring, timing of data collection.
Turn off cameras until it is time to install them on country.
Turn on cameras.
Check batteries are charged.
Check date, time, type of monitoring, timing of data collection all set correctly.
Install camera at the chosen site by tying the camera to a large tree (more than 20cm in diameter) or using a star picket.
Check the camera is taking photos by doing the ‘walk test’.
Put pink tape on the tree to mark where the camera is.
Record site of camera with GPS or cybertracker to pick it up in the future.
Come back in five weeks to pick up the cameras and download the photos.
The following skills are relevant if the camera is being used for motion detection:
Make sure the camera is 0.7m from the ground/base of the tree.
Pull out grass or other plants from in front of the camera because the camera will take a photo of them if they move in the wind.
Set up a bait station two metres away from the camera and make sure the camera is facing the bait station.
Put peanut butter, honey, and oats in the bait container.
Put a rock behind the camera so it is pointing at the bait station.
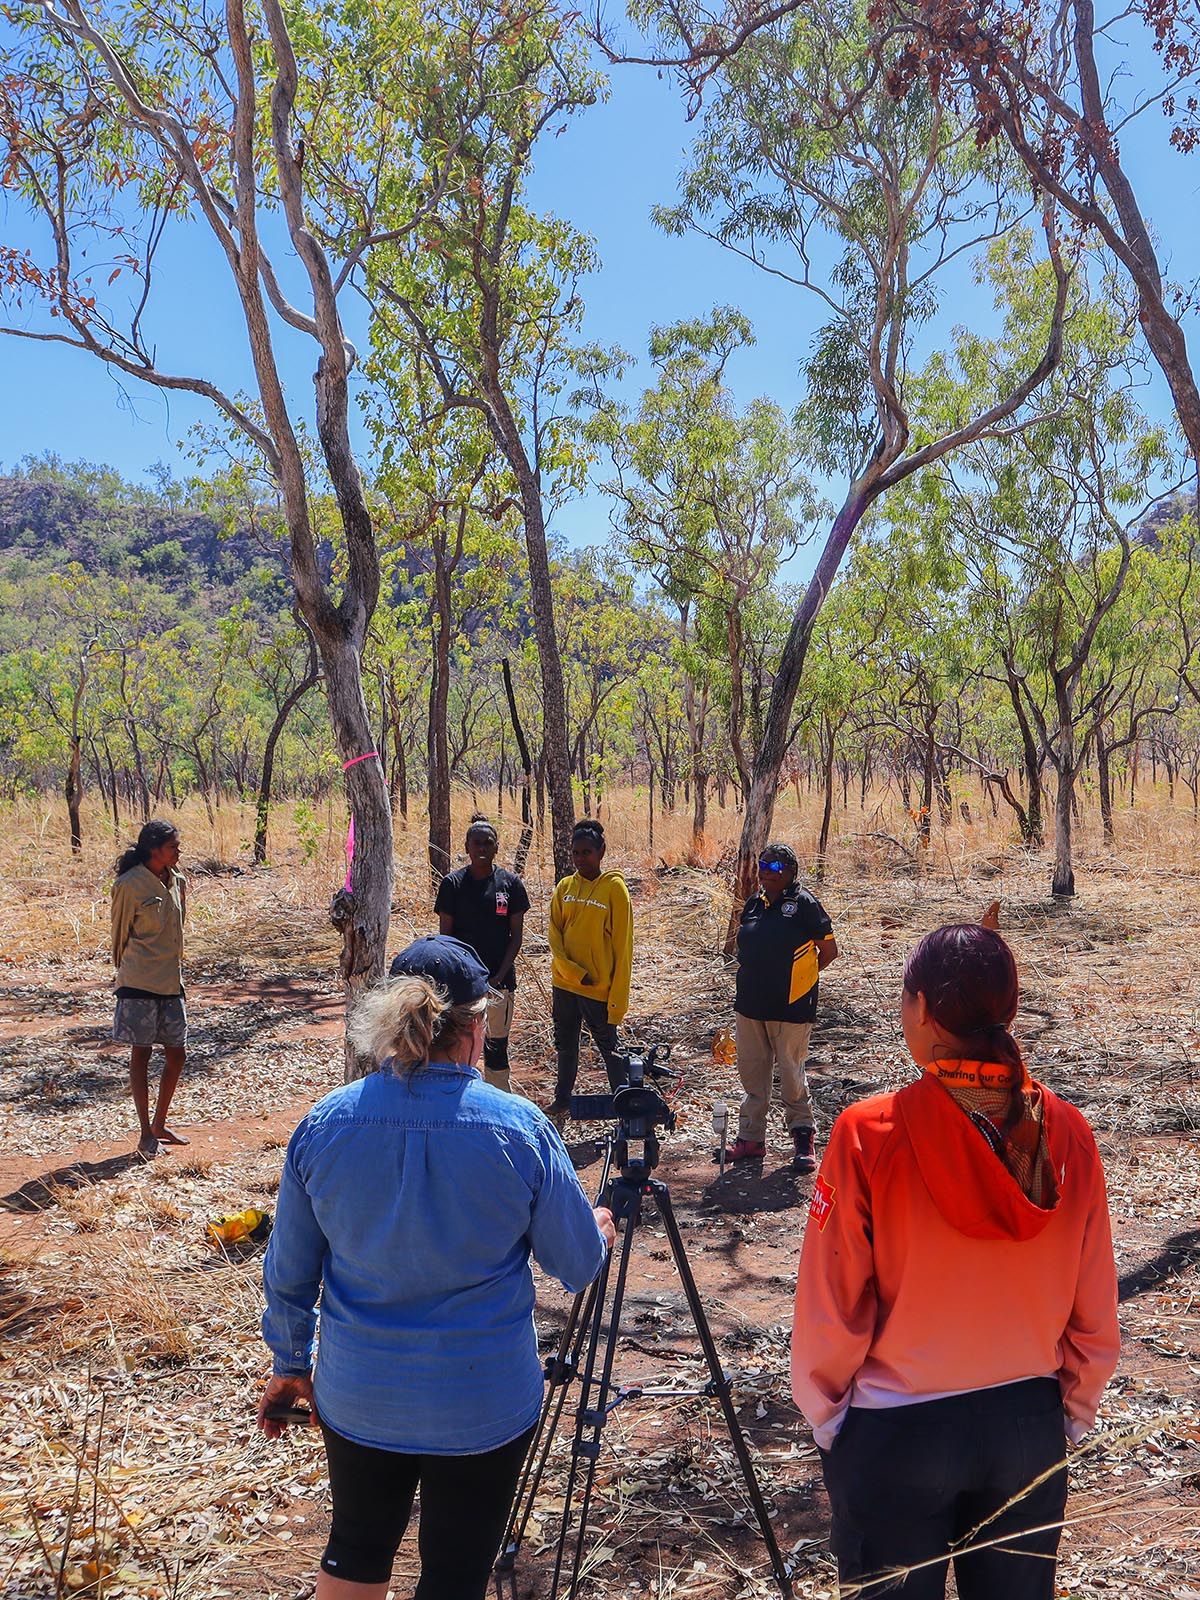
Site survey using video cameras
Learning on country from Elders and rangers through stories
Video cameras are useful tools for young people to learn to use to listen and learn from their Elders on Country. Video cameras can be used to record reflections of Elders and Rangers on the health of Country before and after on-ground management activities and snippets of these reflections can be used as data to guide next actions. The oral nature of video recordings is important for participants and decision-makers with low digital literacy.

Skill Units
Beginner
Intermediate
Advanced
- Cultural protocols and research ethics for using video cameras
- Basic video camera operation and filming techniques
- Active listening and asking good interview questions
- Plan and capture footage for an interview or video story
- Put together a video story
Check the right people have consented to video cameras being used to interview Elders on their Country.
Agree on areas that should and should not be used to interview Elders.
Agree on who the right people are that should be interviewed.
Understand the purpose of interviews for site surveying.
Understand research ethics and processes for Free and Prior Informed Consent, including understanding procedures to protect interviewees’ confidentiality, secure data access and storage, and voluntary participation.
Install and turn on video camera.
Check there are batteries for adequate power to cover the full recording.
Safely charge and store lithium batteries.
Set date, time, mode of recording/resolution, microphone, and background noise setting.
Set up tripod correctly (e.g. horizon and level, distance to interviewee).
Set up lapel microphone on interviewee.
Check lighting and focus of the video.
Understand and practice active listening.
Understand basic interview techniques, including asking simple questions to build the confidence of the interviewee and the benefits of golden silences.
Understand and practice preset and impromptu questions.
Determine interview length and time management (take care not to fatigue interviewees).
Prepare a story board by linking the purpose of the survey to the story that the ranger wants to tell.
Determine appropriate length of the video story.
Draft narrative for the video story.
Capture footage for the different parts of the story board.
Content to come.